Guacamole on Ubuntu
Updated: 20 January 2024
Getting started
To connect to the Guacamole web console:
- Connect to https://[instance url/ip]/guacamole
- The default administrator credentials are:
- Login: guacadmin
- Password: guacadmin
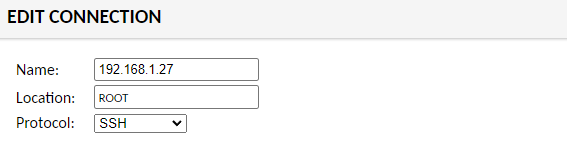
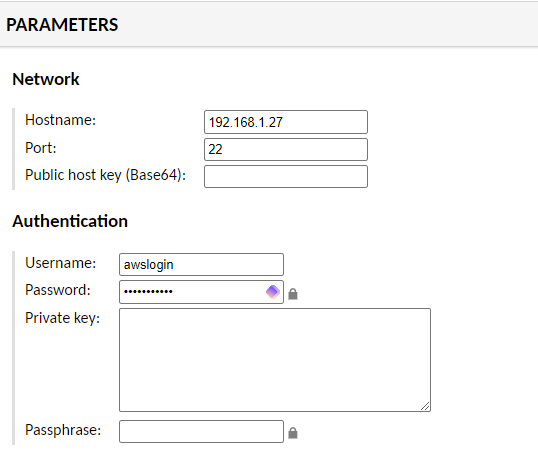
How to add an SSH connection?
- Connect to https://[instance url/ip]/guacamole
- Go to Settings > Connections
- Click “New Connection”
- Fill the details of the connection. For example:
(*) ${HISTORY_PATH}/\${HISTORY_UUID}
- Click "Save"
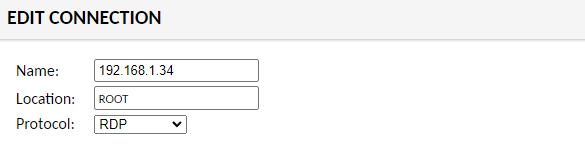
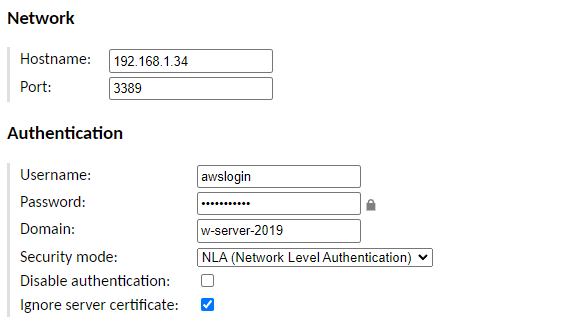
How to add an RDP connection?
- Connect to https://[instance url/ip]/guacamole
- Go to Settings > Connections
- Click “New Connection”
- Fill the details of the connection. For example:
(*) ${HISTORY_PATH}/\${HISTORY_UUID}
- Click "Save"
Security
Authentication
TOTP MFA
Prerequisites: To use TOTP as authentication, the user needs to have an App like Google Authenticator, or Microsoft Authenticator on their mobile (alternatively, but not recommended, a web browser App like “Proton Pass” can be used).
To enable built-in TOTP on Guacamole:
-
SSH to the Guacamole instance
-
Publish the extension to Guacamole:
-
Restart the tomcat service:
HTTS / TLS: replacing the TLS certificate
It is recommended to replace the installed default certificate.
By default, the private key and the certificate are stored in /opt/tomcat/ssl/keyStore.p12
It has no password.
Ideally, you generate a new key and certificate pair with your PKI and replace the p12 file with yours.
Ensure that tomcat own the p12 file.
If a password is set on the p12 file, you have to specify it in the tomcat configuration:
-
File:
/etc/tomcat9/server.xml -
Value:
keystorePass
Alternatively, you can generate a new self signed certificate with the following commands:
-
SSH to the Guacamole instance
-
Change of folder:
-
Generate the key pair and the self-signed certificate:
-
Put the private key and the certificate in a p12:
-
Ensure that the owner of the p12 is tomcat:
-
Restart tomcat:
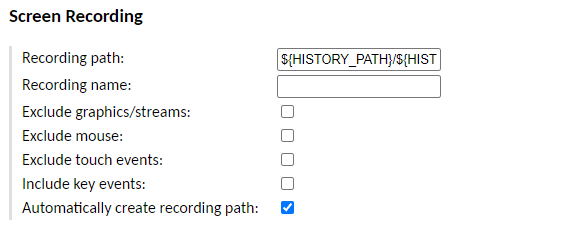
Session recordings
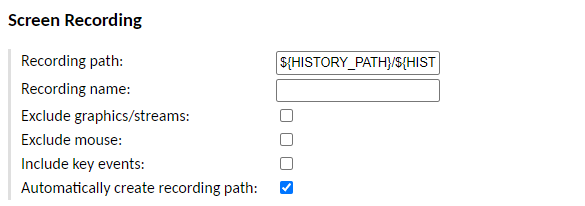
How to enable session recording?
Session recording is enabled on connection basis.
To enable session recording on a connection:
-
Connect the the Guacamole web console: https://[instance url/ip]/guacamole
-
Authenticate as an administrator (ex: guacadmin).
-
Go to Settings > Connections
-
Click on the connection on which you want to activate the recording.
-
In the “Screen Recording” section, set:
-
Recording path: ${HISTORY_PATH}/${HISTORY_UUID}
-
Automatically create recording path: X
-
-
Save the configuration update

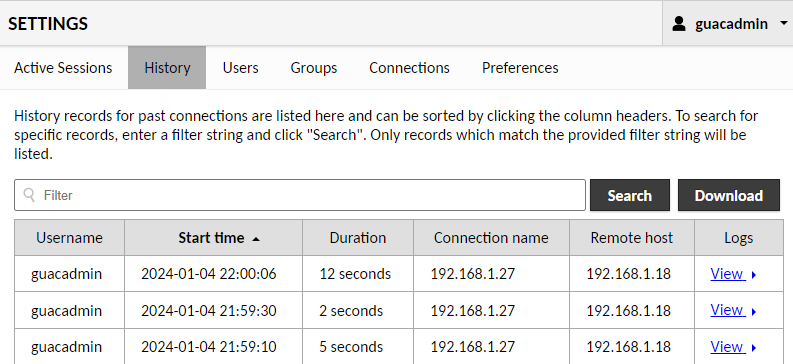
How to view recordings?
When this connection will be used, you will be able to view the recording in Settings > History.
Where are the recordings on the instance?
On the instance, recordings are saved in the /opt/guacamole/recordings/ folder.
Warning
You should monitor closely used space on your instance, to avoid a denial of service by lack of free space.
Logs
You can find the logs there:
/var/log/tomcat9/catalina.out/var/log/syslog